One of the most common enquiries and support requests that we get at Teamgo involve badge printers. Badge printers are designed to be very simple to operate but they can be tricky the first time you use one. So, if you are experiencing or have experienced trouble with your badge printer this guide is for you.
The questions we receive go from “what type of badge printer should I get?” to “how can I change the label size of my printer?” So this is going to be a comprehensive guide to cover the widest range of recurring questions. If we’ve missed anything you want to know more about, tweet us!
If you are experiencing or have experienced trouble with your badge printer this guide is for you.
______________________________________________________________________________________________________________
Here are the fields we’ll cover
- How printing works
- Printer and label specifications
- How to connect the printer to the iPad
- How to change the label size
- How can I reprint badges?
- Why is my printer not working?
______________________________________________________________________________________________________________
1. How printing works
Printing works through a direct connection between the iPad and the Label Printer over your office’s WiFi network or Bluetooth pairing (in supported models). You can use the same printer to print different designs of badges including visitor and staff badges.
Breaking it down:
- Visitor signs in on the iPad terminal
- The iPad terminal sends the sign-in data to the Teamgo cloud
- Teamgo then sends data back to the iPad confirming the visitor sign-in and requesting a badge to be printed
- The iPad sends a print request to the connected printer
To successfully print badges using Teamgo, you will need to make sure that you have the correct model of printer and labels. So keep reading!
2. Printer and label specifications
Printer:
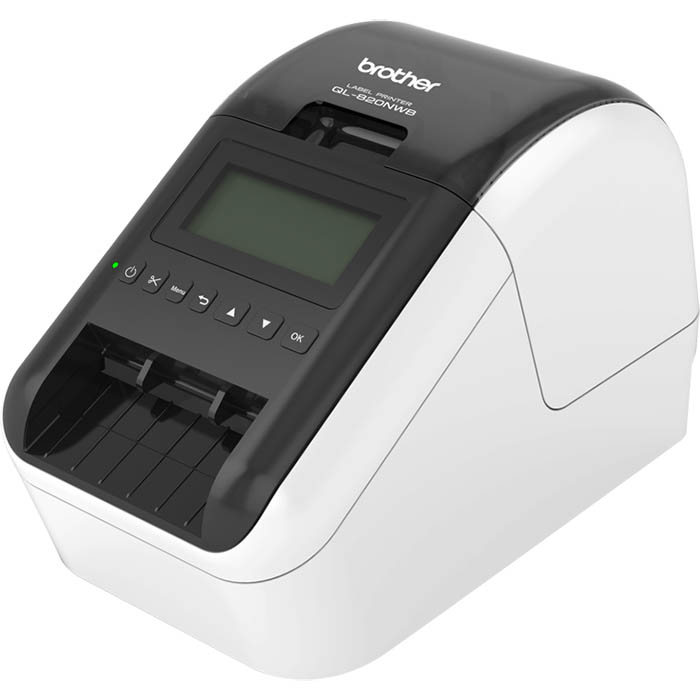
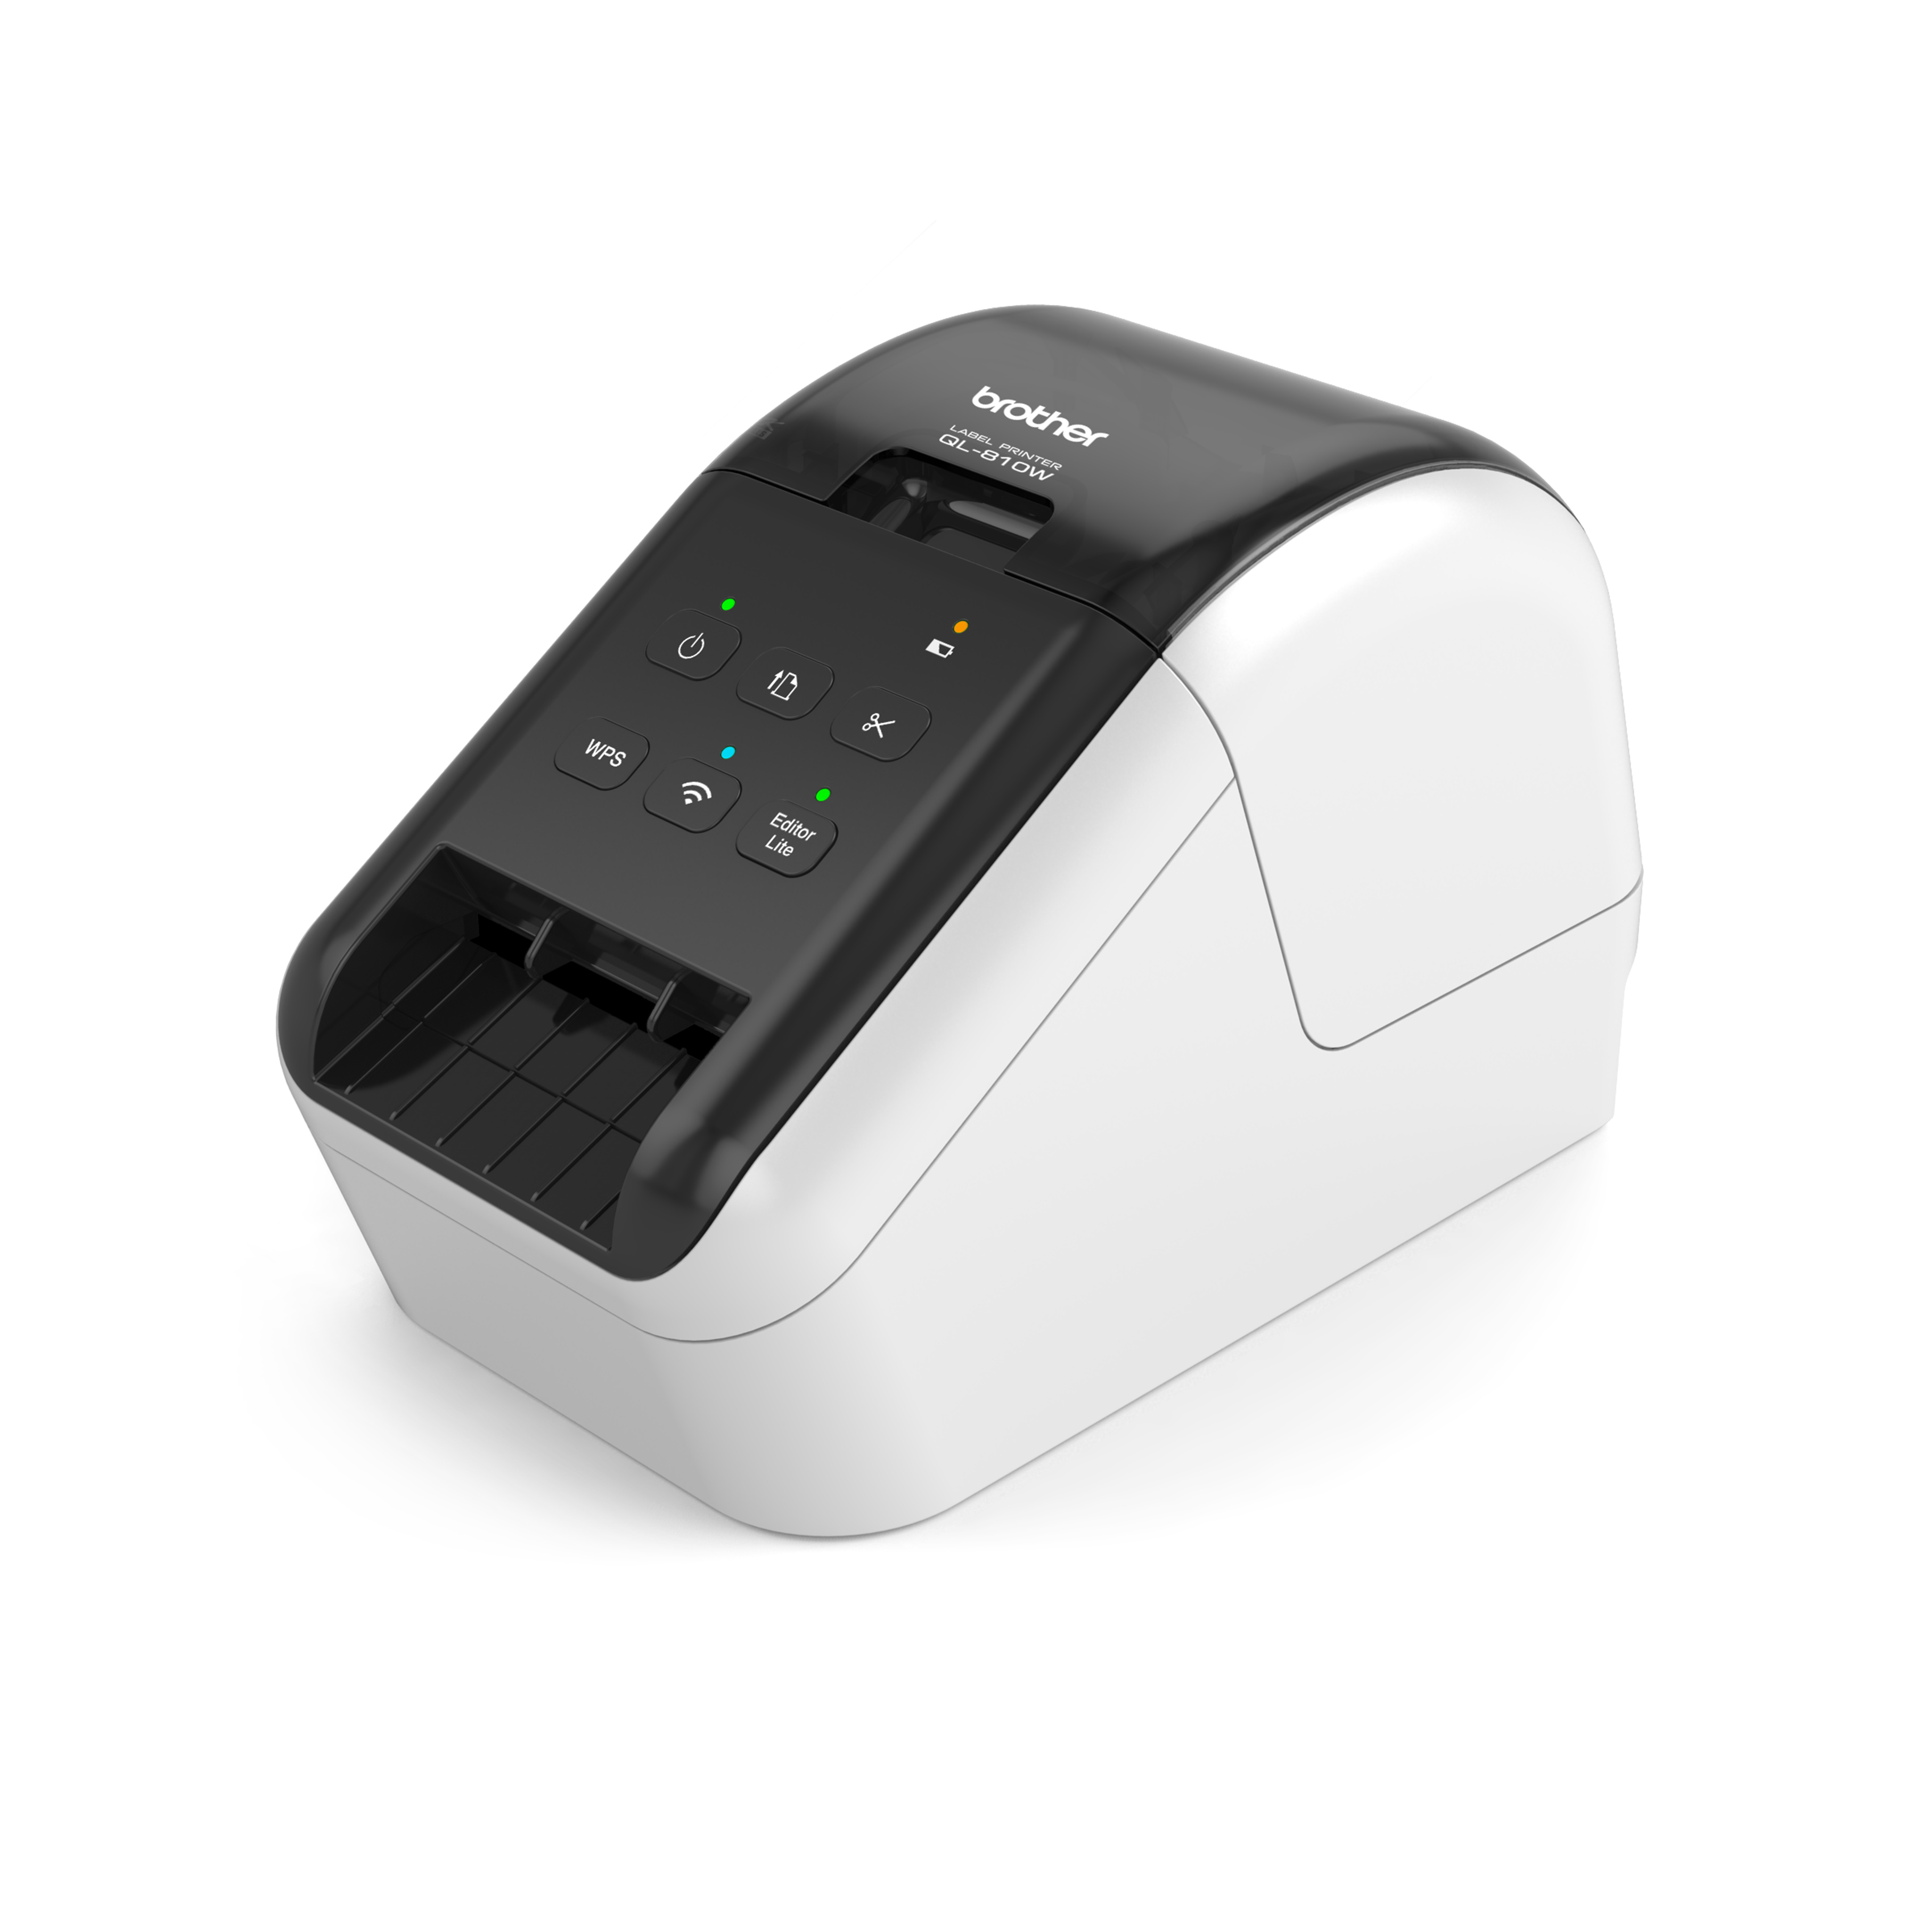
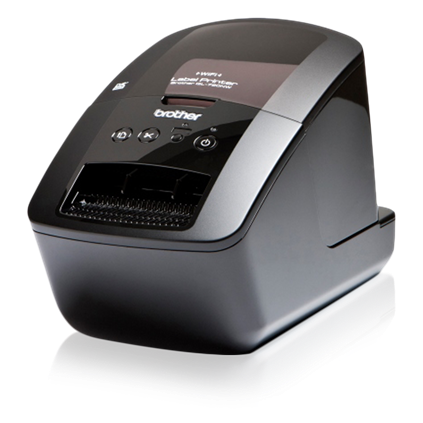
To successfully print badges you need to make sure you are running a supported printer model. Teamgo only supports Brother Label Printers of the following models:
Current Models
- Brother QL-820NWB Wireless Printer (Brother Online Store, Teamgo Online Store)
- Brother QL-810W Wireless and Bluetooth Printer(Brother Online Store)
Retired Models (still supported)
- Brother QL-720NW Wireless Printer
All of our supported models include LAN, WiFi or Bluetooth connectivity, which means no wiring needed between the printer and the iPad.
Also, Brother Printers work with a Direct Thermal mechanism which doesn’t require any ink or replacement components either.
We recommend the Brother QL-820NWB Wireless and Bluetooth Printer model, which is Brother’s latest model.
Label:
When it comes to the labels, make sure you have the correct label size:
- White Label Roll 62mm x 100mm – 300 labels per roll.
We recommend the use of Brother DK-11202 or Brother DK-1202 Labels, which are guaranteed to match the recommended printers and size requirements. However, you can still purchase labels manufactured by other brands, as long as they match the size requirements and are compatible with the Brother Printers.
You can also change the label size if you wish, though that is not recommended. Refer to the “Changing Label Sizes” section of this article to see how.
Please, note that Teamgo does not support the Brother DK-2201 and DK-2251 badges that come with the Brother QL-820NWB printer. Please dispose of those badges and purchase any of the supported badges listed above.
3. How to connect the Brother Printer to your Visitor Management System
Before you start connecting a printer make sure that you followed the first step and have a compatible printer and labels.
3.1 Connecting through Wireless
This process is compatible with the following models:
- Brother QL-720NW Wireless Printer
- Brother QL-810W Wireless Printer
- Brother QL-820NWB Wireless and Bluetooth Printer
This is a two-part process:
Part 1: Connecting your printer to your office’s Wireless network.
Part2: Connecting your printer to the iPad.
Part 1. Connecting your printer to your office’s Wireless network
You will need some key information about your WiFi network including the network SSID/name and network password.
On your Windows or Mac computer, open your browser and type “install.brother”. This will take you to the software installer webpage. Download the Windows or Mac installer according to your computer’s operating system.
Once the file has been downloaded, double click it to begin the installation.
Connect your Brother printer to your computer via USB and make sure that connection is maintained during the installation.
Click AUTO SELECT and verify the model of your printer. Once that’s done, click OK to proceed.
Follow the installation steps that show up on your screen, always making sure that your printer is still connected to the computer via USB, that you have chosen the correct Wifi network and that you select the correct printer model.
If you have difficulties following the steps of the installation process follow these detailed tutorials by Brother:
Part 2. Connecting your printer to your iPad via WiFi
To proceed, make sure that your Brother Printer is connected to a WiFi network and hat you have downloaded the Teamgo app on your iPad
Now, here’s how you connect the Brother Printer to the iPad:
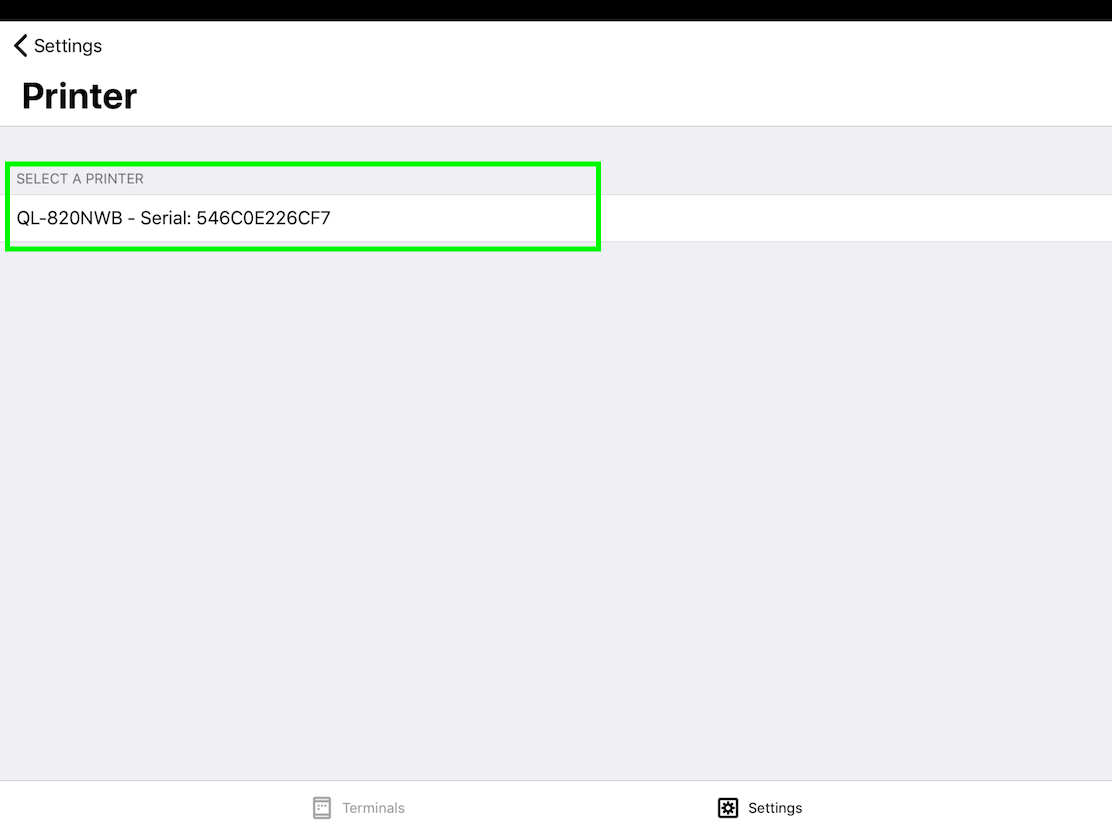
- Open the Teamgo app on your iPad and log in with your administrator username and password.
- Press SETTINGS.
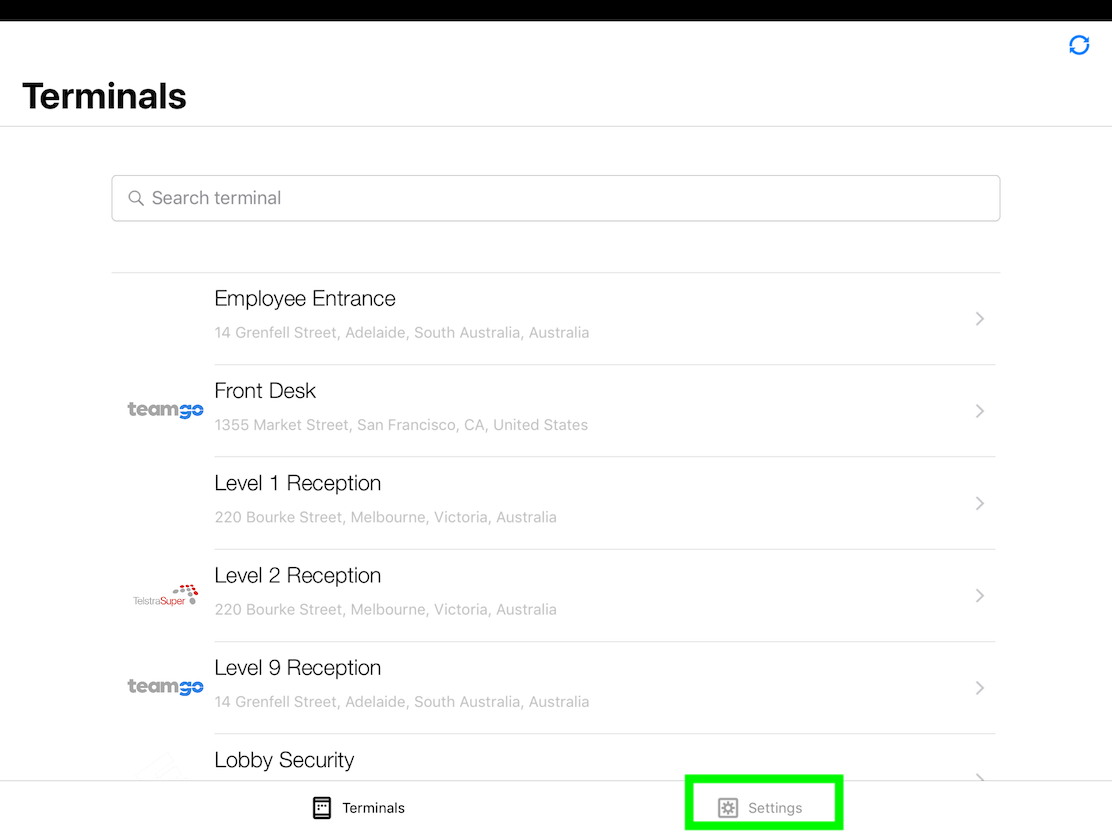
- Press PRINTER.
Now the iPad will start searching for connected printers. This might take a few moments.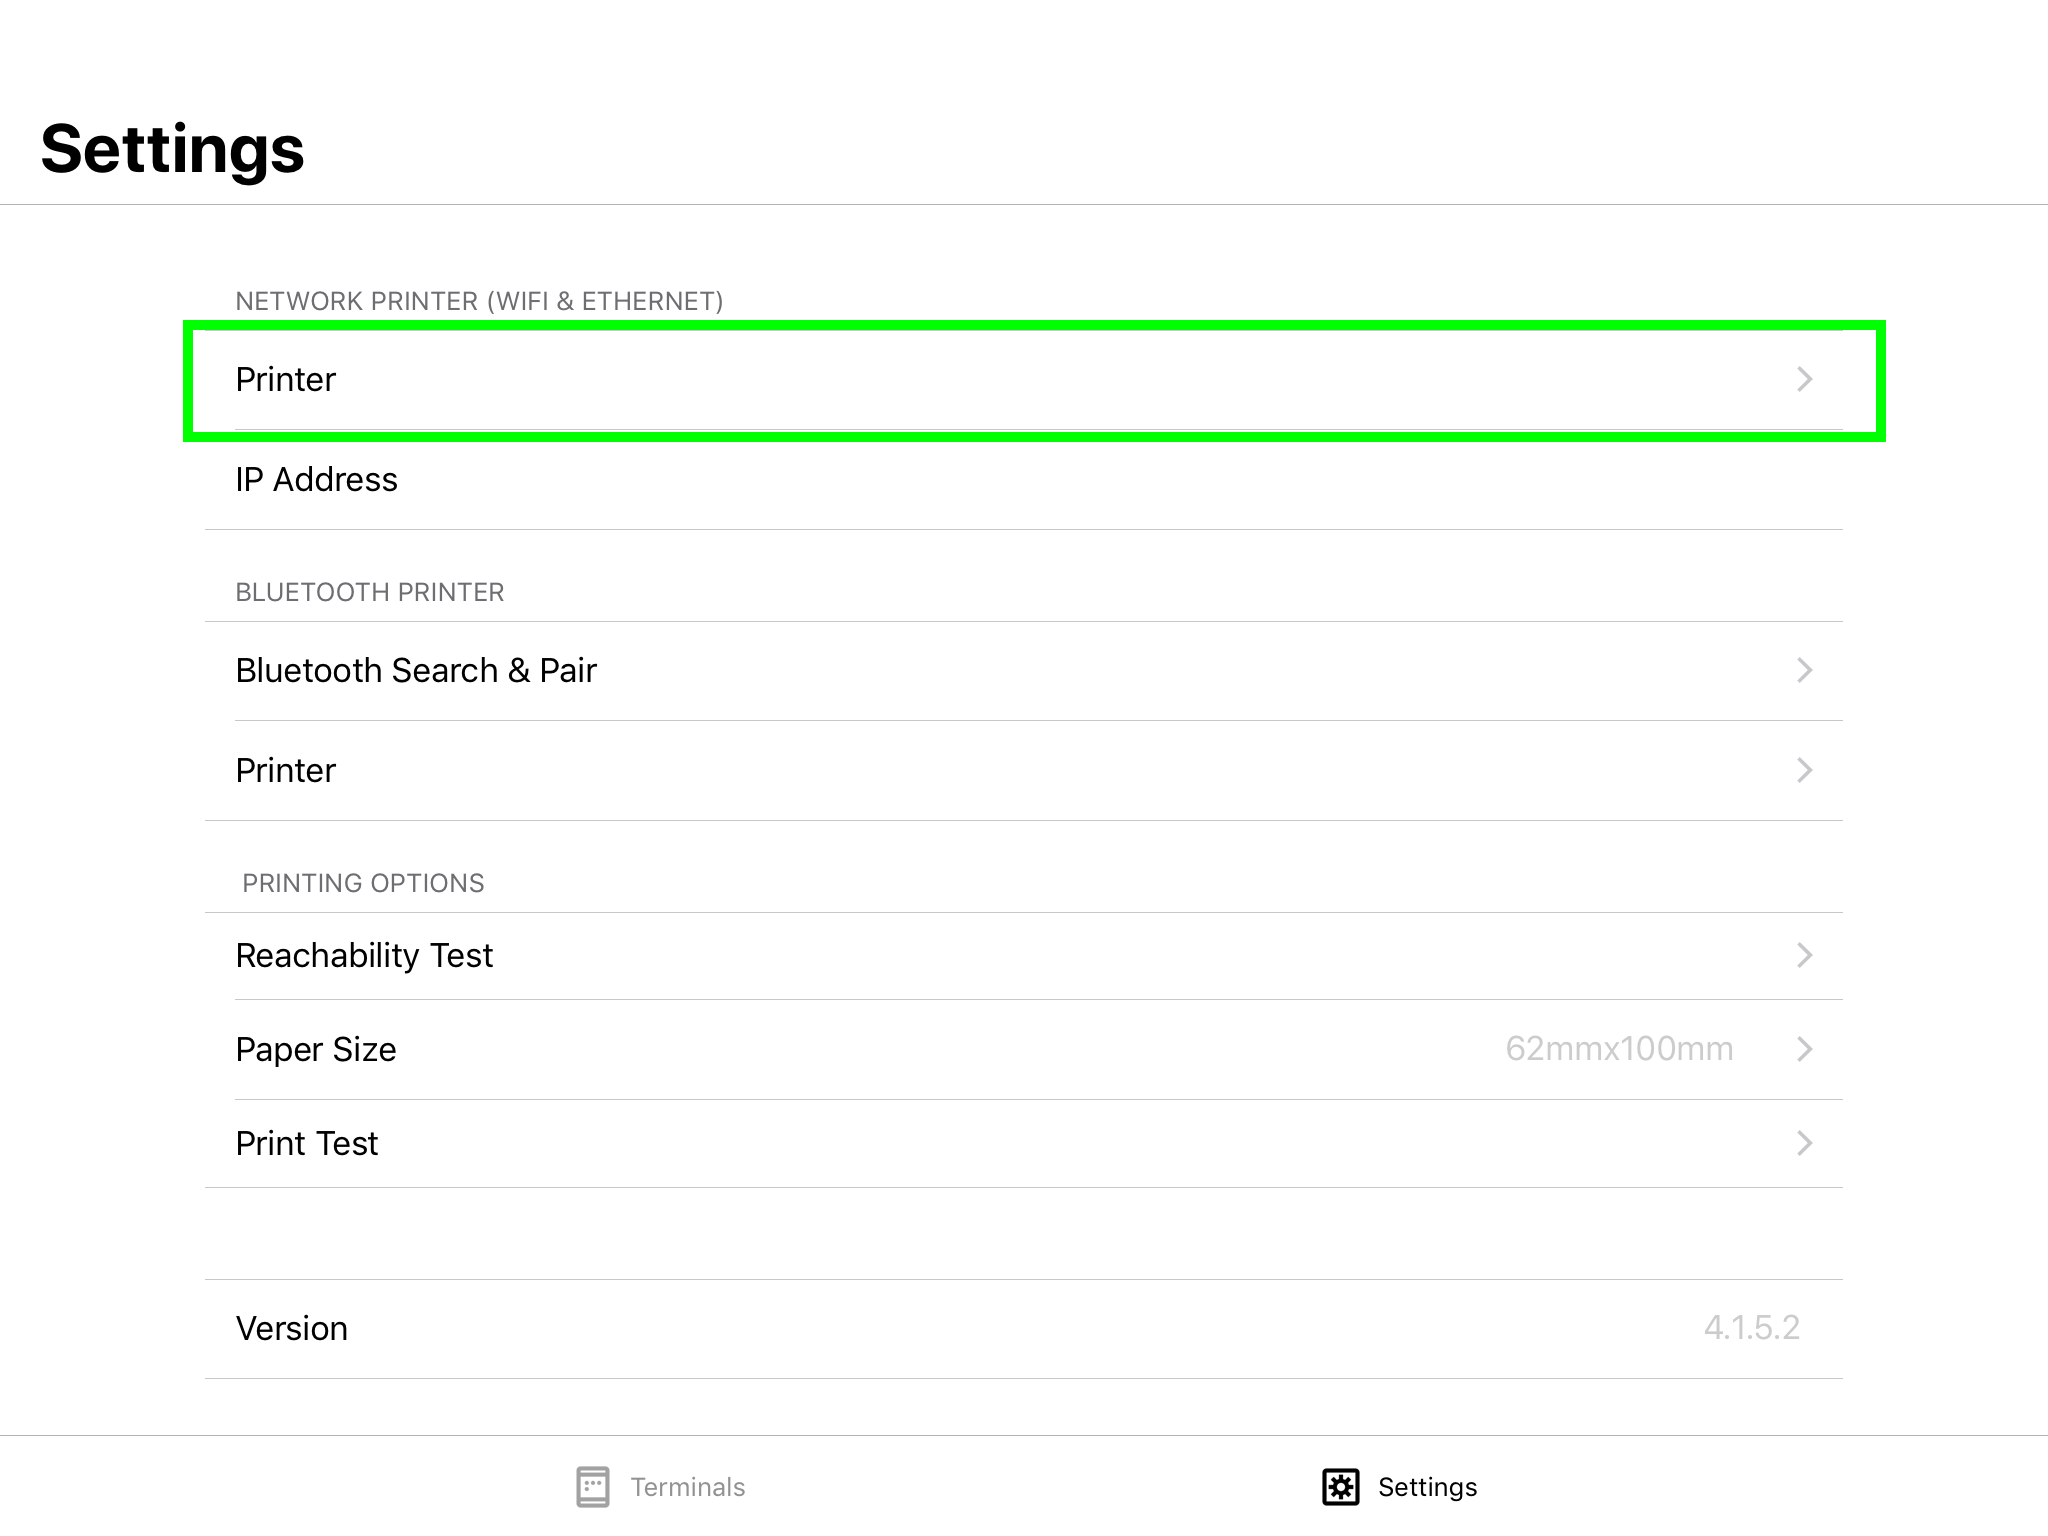
- A list of available printers will appear on your screen. Select the one you wish to connect to.
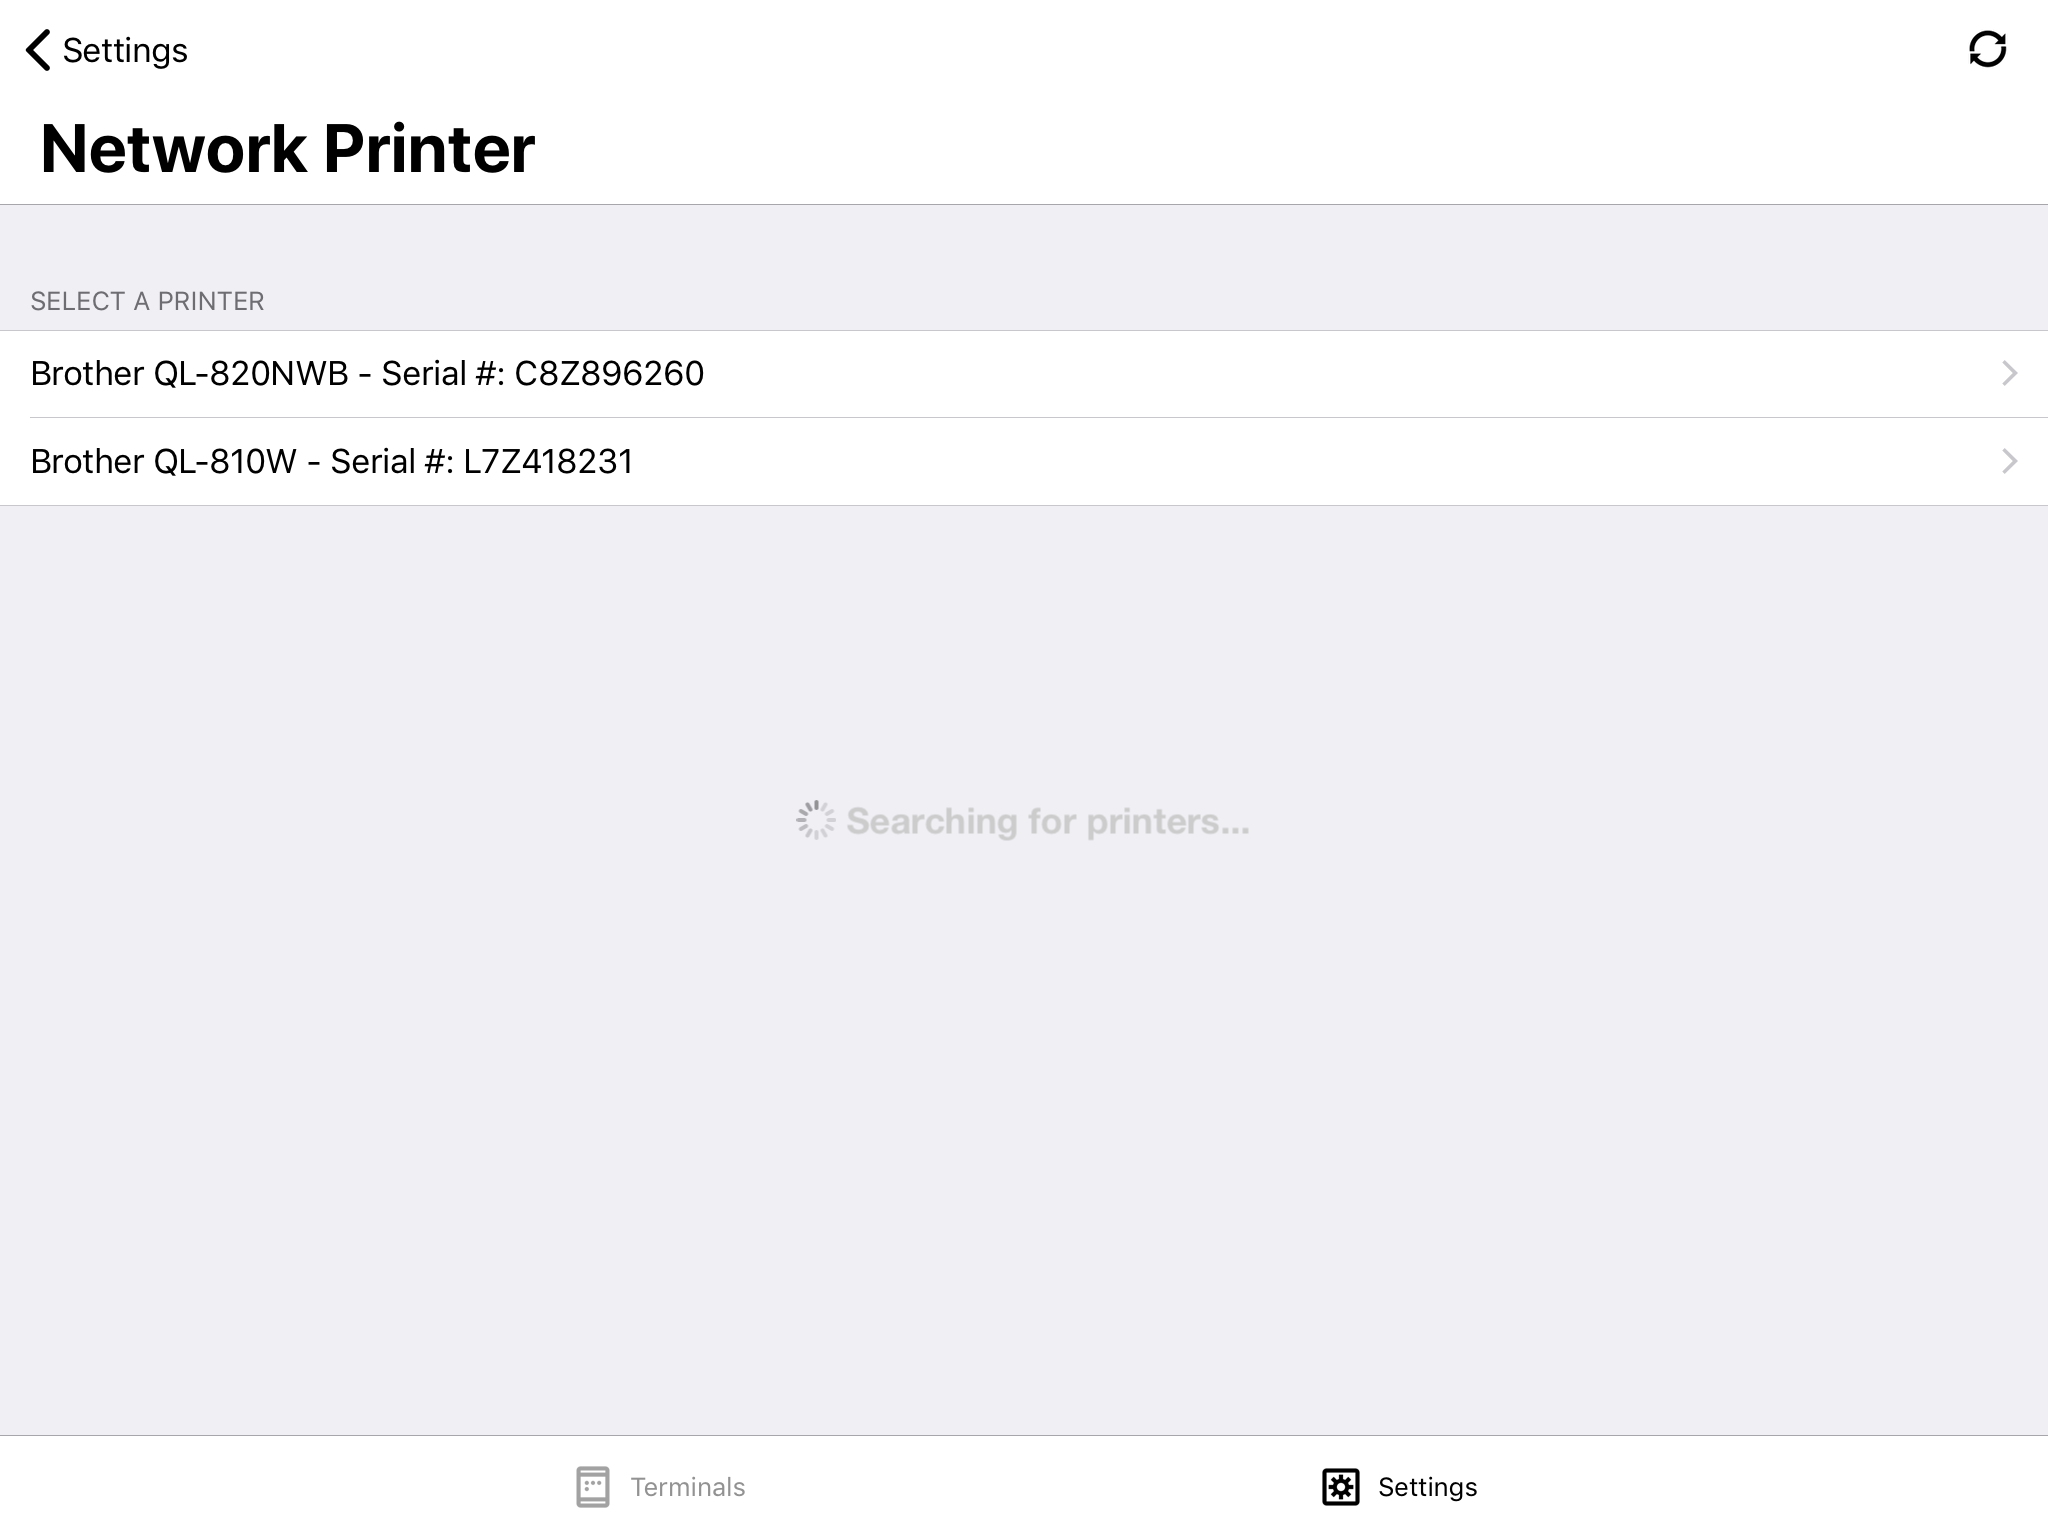
- Once you select one, the app you take you back to the previous screen. Please notice that bellow the PRINTER option you will see the printer’s IP Address.
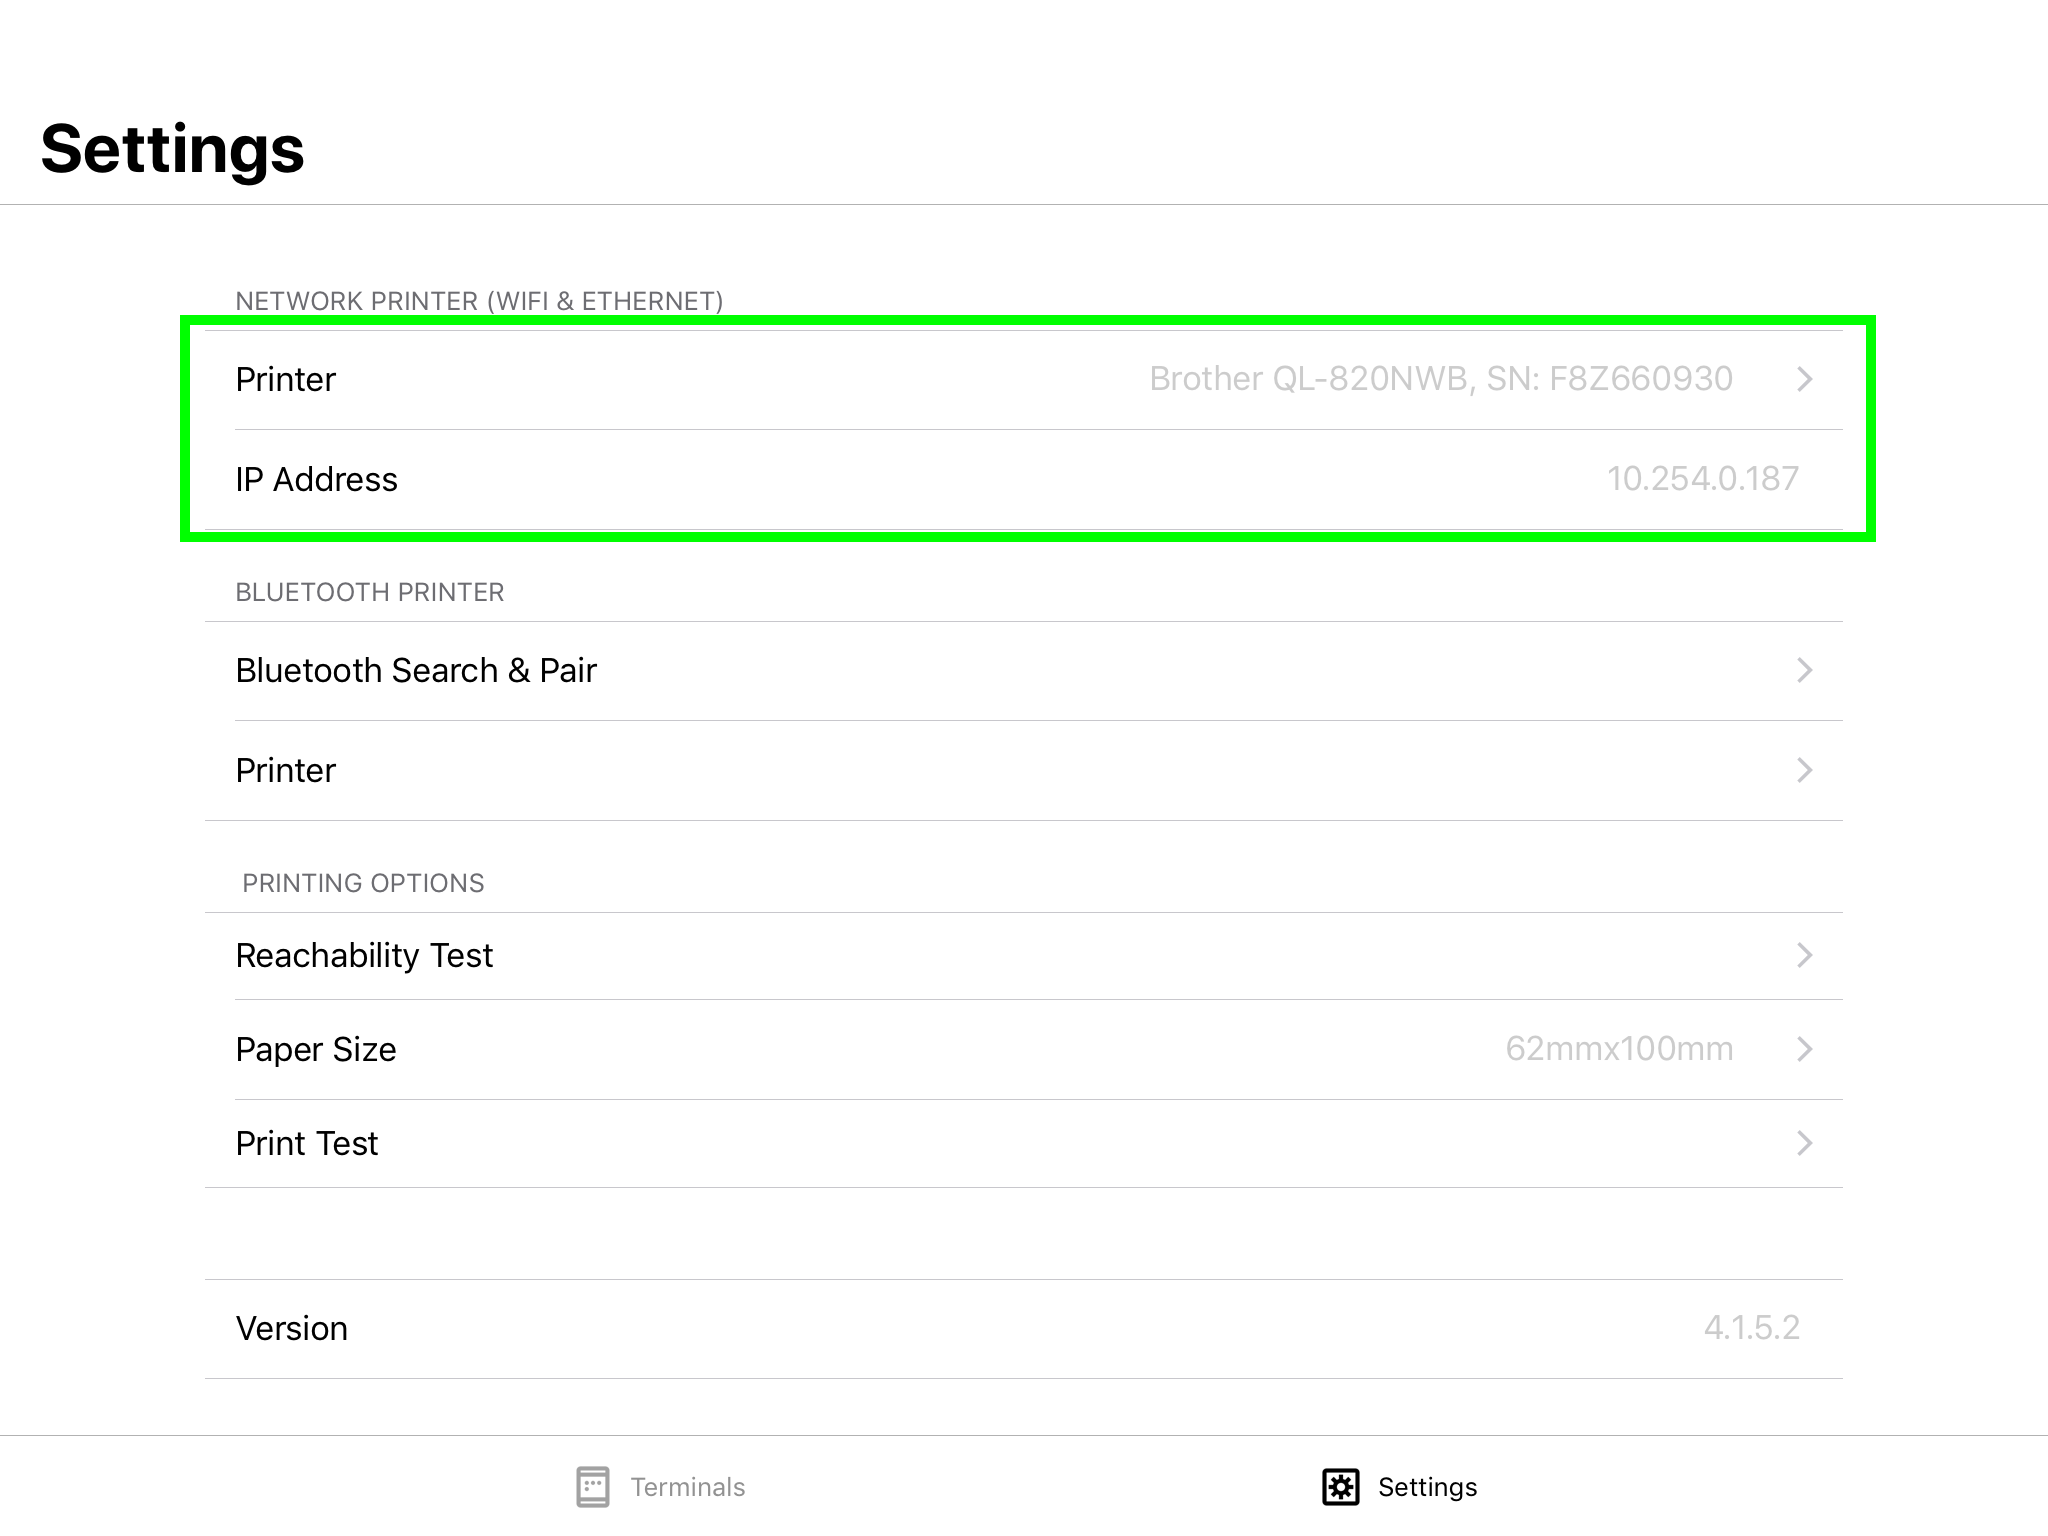
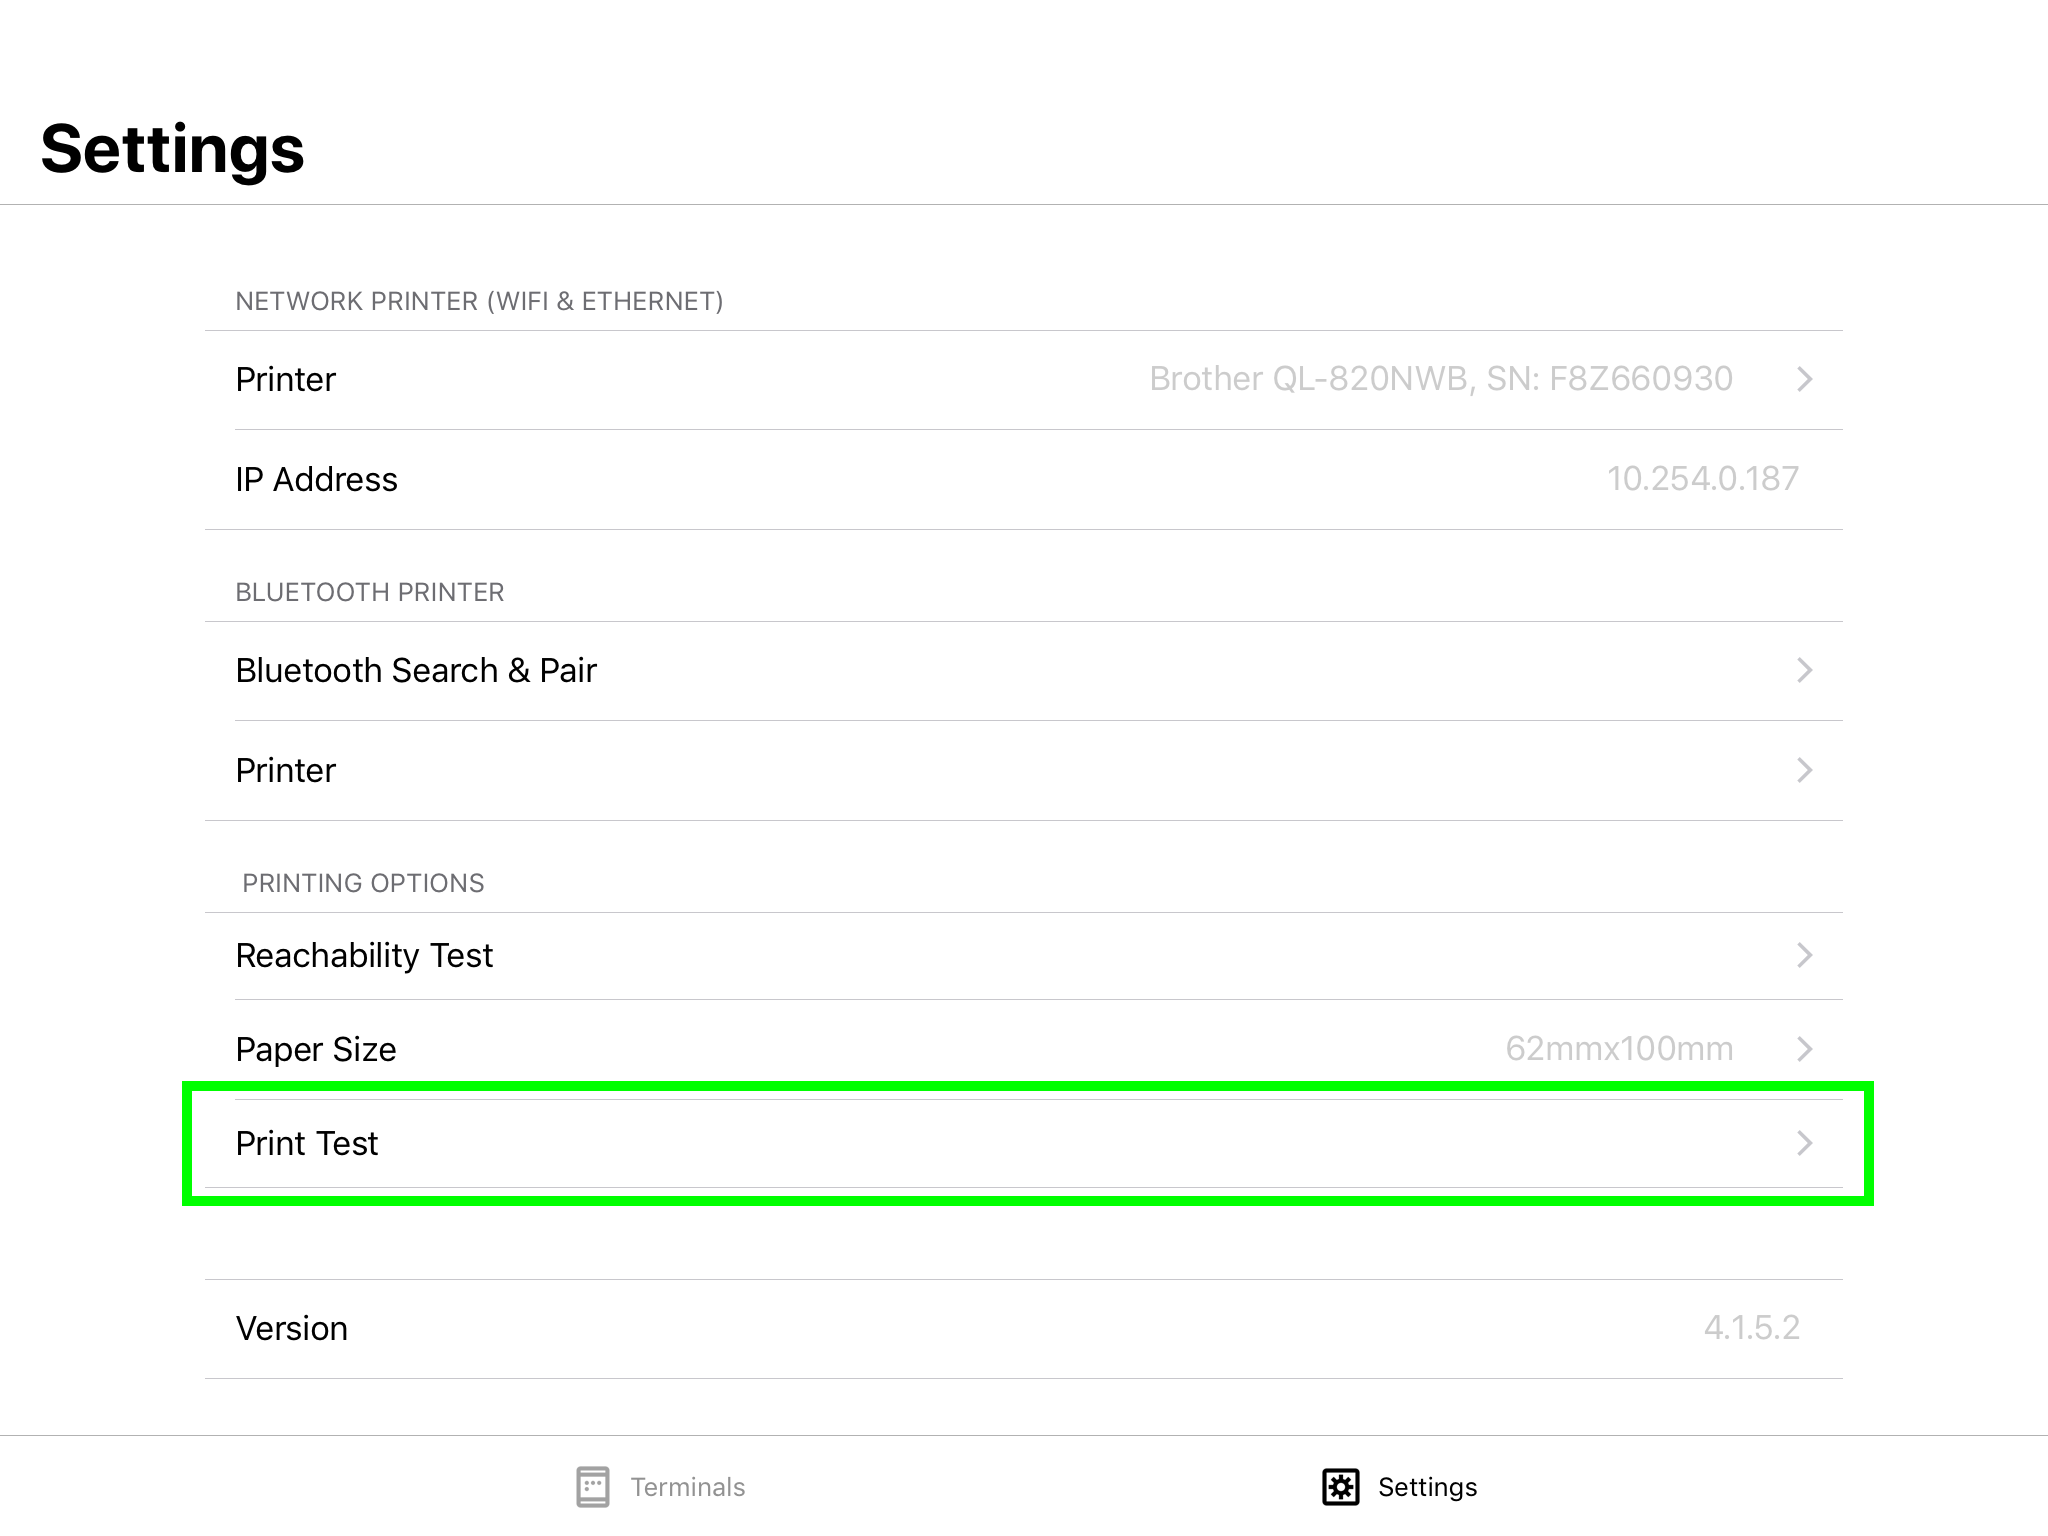
- On your screen, select PRINT TEST to ensure your printer has been connected successfully. This will send a print job from your Teamgo dashboard to the iPad and onto the printer.
- Your printer is now connected. We recommend running a test sign in to ensure everything is functioning smoothly
3.2 Connecting through Bluetooth
This process is only compatible with the Brother QL-820NWB printer.
First things first, make sure your printer is set up to use Bluetooth. Here’s how:
- Press the MENU button.
- Use the up and down arrows to find the BLUETOOTH MENU.
- Press OK.
- Use the up and down arrows to find the BLUETOOTH ON/OFF option.
- Press OK.
- Use the arrows again to select ON.
- Press OK.
Now that your printer’s Bluetooth is activated we can connect it to the iPad. Again, make sure that you have downloaded the Teamgo app on your iPad.
- Open the Teamgo app on your iPad and log in using your administrator username and password.
- Press SETTINGS at the bottom of the screen.
- Select the BLUETOOTH SEARCH & PAIR option.
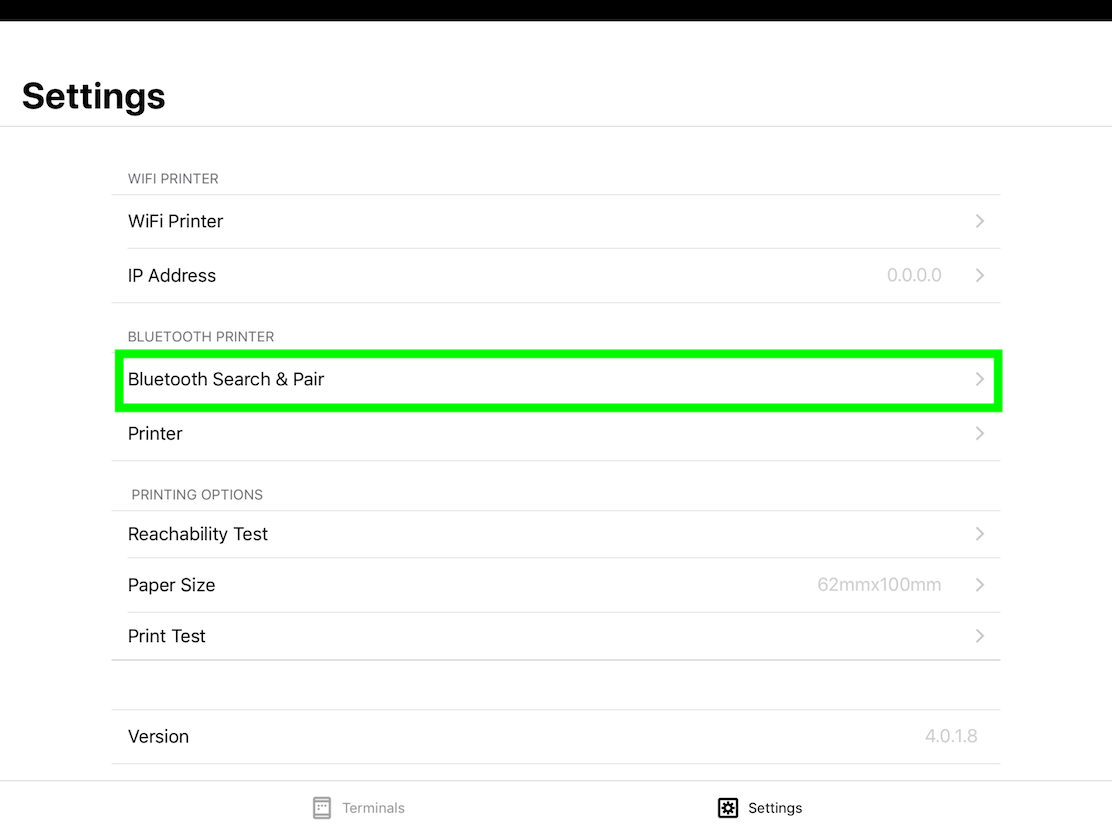
- Wait for your iPad to find your printer via Bluetooth. This might take a few moments.

- Select the printer you wish to connect to on the screen. It might take a few more moments until this is finalised.
- Your printer is now paired.
- Run a PRINT TEST to ensure your printer is running smoothly.
PLEASE NOTE: You can connect multiple iPads to one printer using WiFi connection. However, if you are using a Bluetooth connection, you can only connect one iPad to one printer at a time.
4. How to change your label size
Teamgo only recommends the Brother 62 x 100 mm Shipping Label (DK-11202 and DK-1202). These labels are the optimal size and give the best results. This is also the default size that your terminal will be set to.
- DK-11202 is supported by default but you would enter 62mmx100mm
- DK-22205 you would enter 62mmx30.48m
If you do wish to use a different label size, you can change the label size in your terminal, though the results might not be optimal.
To change the label size, follow these steps.
- Login to your Teamgo App and go to PRINTERS.
- Select the SETTINGS tab.
- Select PAPER SIZE.
Here you will see these options:
– 62mmx100mm (your default size correspondent to the Brother DK-11202 labels)
– 62mmx30.48mm (correspondent to the Brother DK-22205 labels)
– Custom Size - Choose a size from the list or enter a custom size.
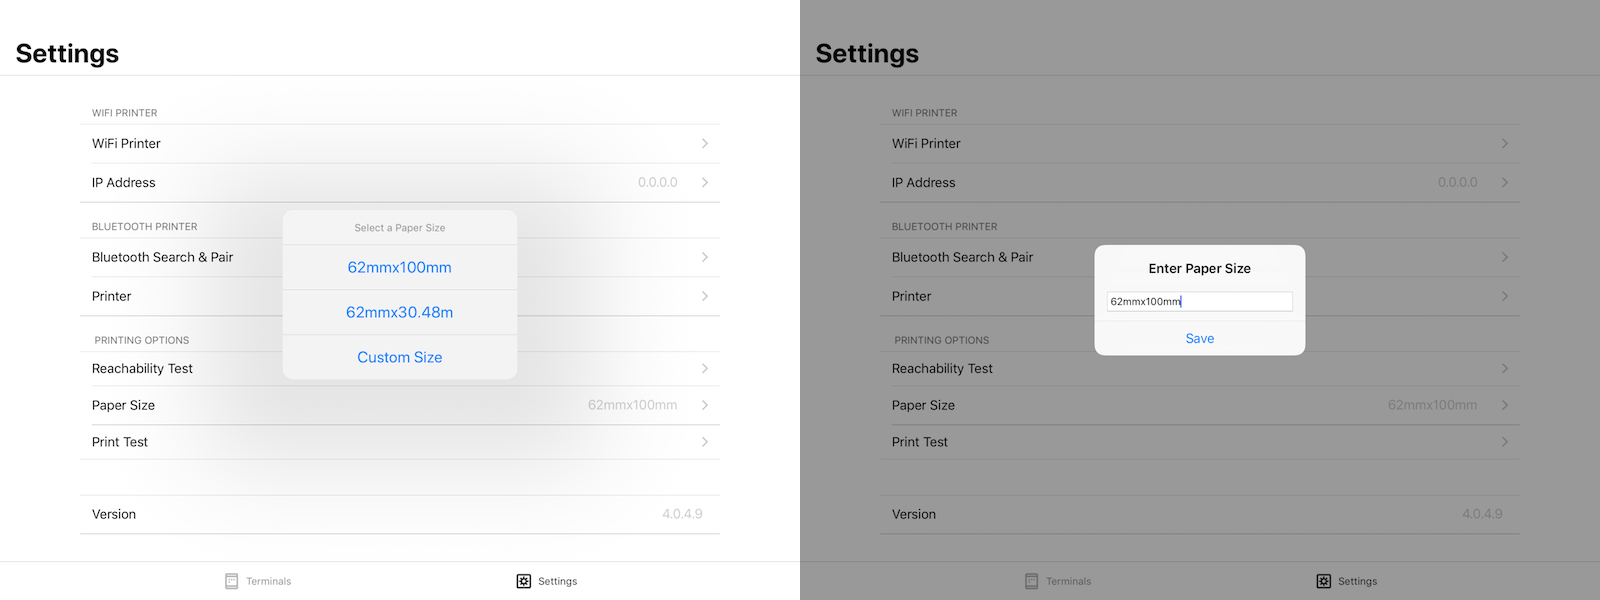
- Check the formatting and SAVE.
PLEASE NOTE: it is important to enter the label size using the correct format. If you do not enter this information correctly, the printer is likely not to recognise the paper dimensions and won’t be able to print. You can find the label size on the paper spool (plastic ribbon) or on the packaging of your labels.
Refer to the diagram below for the correct format:![]()
5. How can I reprint badges?
Let’s say that your printing job didn’t go through or that you need to print a second badge for a visitor because the first one got damaged. There are two easy ways of reprinting a badge – through your Teamgo dashboard and through your iPad terminal.
Here’s how:
Reprinting your badge from the iPad terminal
To reprint a badge from the terminal you will need to have the SIGN OUT feature enabled on your iPad kiosk. You can enable this feature using the terminal designer on your dashboard.
To reprint a badge:
- Tap SIGN OUT on your terminal’s home screen.
- Find the name of the person whose badge you want to reprint on the signed-in people list.
- Tap the blue PRINT icon next to their name.

This will send a print request to the connected Brother label printer.
Reprinting a badge from your dashboard
- Log into your Teamgo dashboard using your admin username and password.
- On your dashboard’s home screen, go to LOCATIONS
- Navigate to the current signed-in activity
- Click Manage Visitors
- Tick the box in front of the name of the visitor whose badge you would like to reprint
- Click Print Badge
- Select which Kiosk printer you would like to print it from
- Click Print
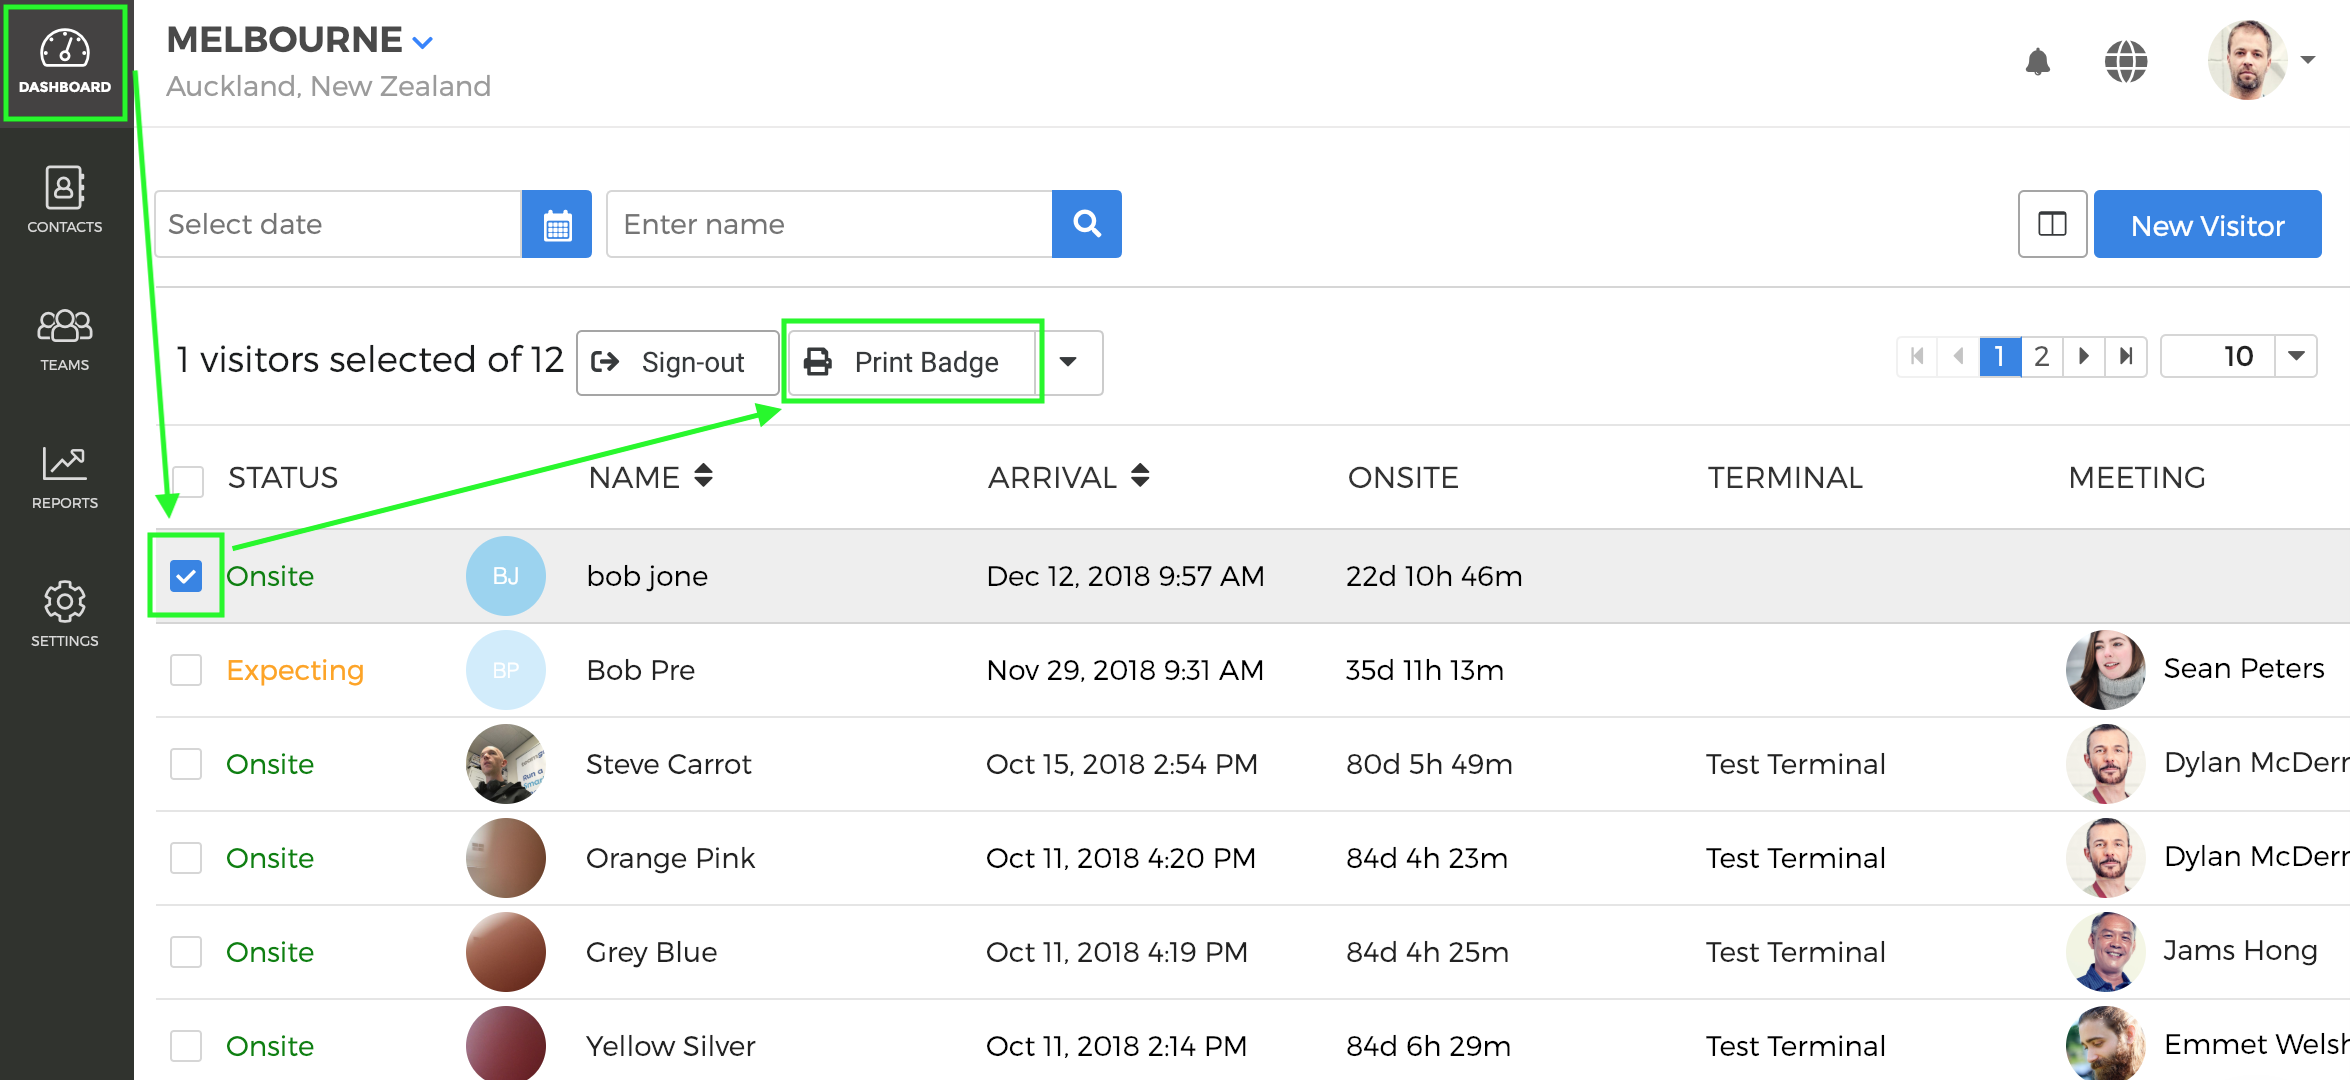
The Teamgo dashboard will send this print request to the printer connected to the terminal you’ve selected.
6. Why is my printer not working?
This section will help you troubleshoot and find the possible reasons why your printer might not be working. We will go through the most common reasons why badges fail to print and give you quick and easy solutions.
You don’t have the right printer model
Teamgo only supports the following badge printer models. Please, ensure you are using one of them to successfully print badges.
- Brother QL-720NW (Lan, Wireless)
- Brother QL-810W (Lan, Wireless)
- Brother QL-820NWB (Lan, Wireless, Bluetooth)
You don’t have the right label size
Teamgo supports the DK-11202 labels which are 62x100mm. Other formats may work at times but we do not officially support these formats. Please ensure you are always using the DK-11202 labels and that they have been inserted into the printer holder carefully.
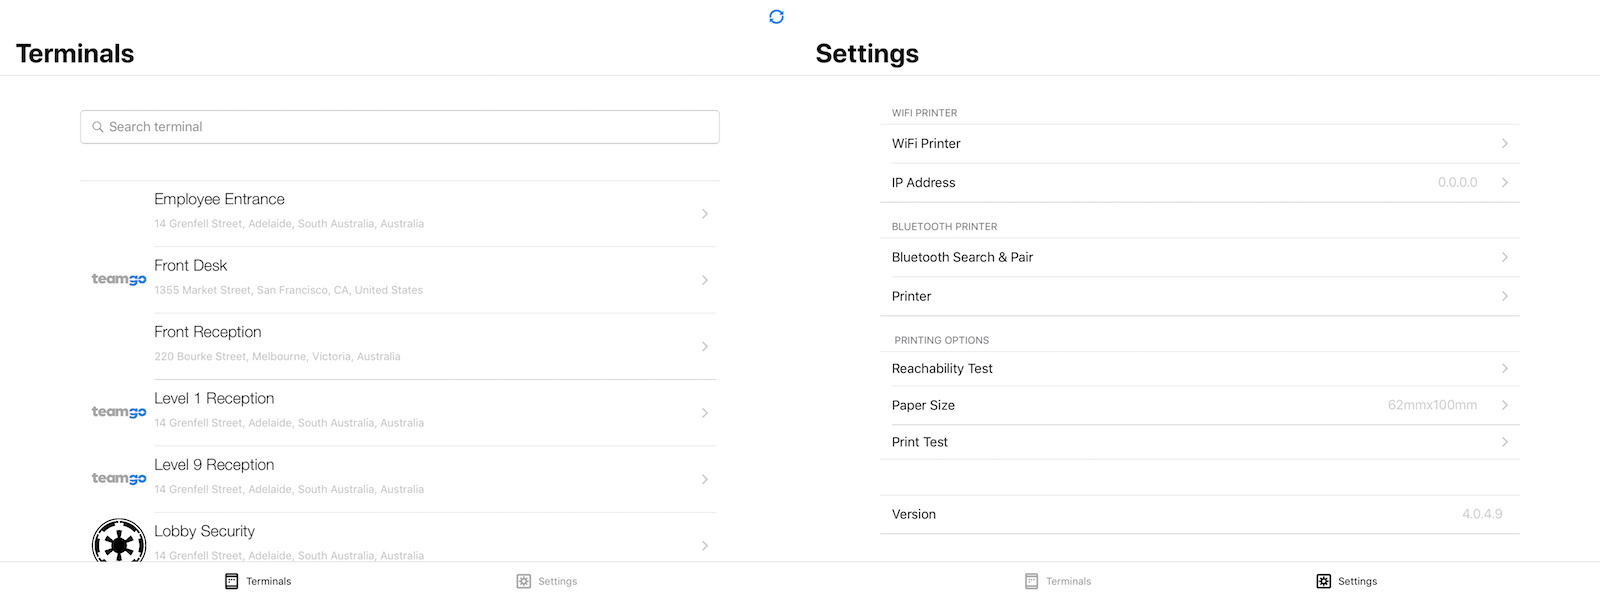
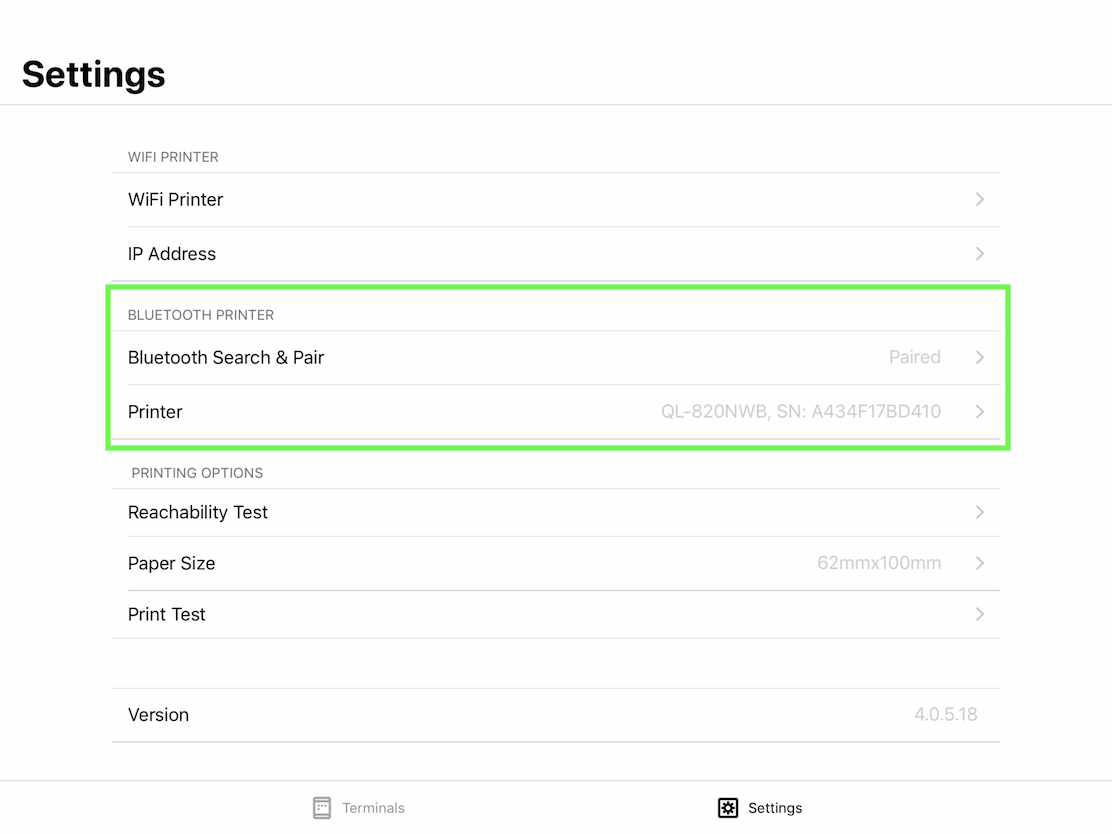
Your printer might be configured wrongly
The screen below shows the settings screen of the Teamgo iPad app. Once you install the iPad app and login with your username and password you will be presented with your Terminal and Printer options.
To access the printer settings, tap SETTINGS at the bottom of the screen.
- Network/ WiFi Printer – tap to select your network-connected printer. If your printer is correctly set up on the network, it should appear in the printer list after a few moments.
- IP Address – this is your printer’s network IP address. The IP address will automatically be displayed once the printer is connected. You can also manually enter the printer’s IP address if it is not detected on the network or if it is not discoverable.
- Bluetooth Search & Pair – for the QL-820NWB series printer, this function operates similarly to the WiFi printer option. When you select it, a list of Bluetooth enabled printers which you can connect to will be displayed.
- Bluetooth Printer – this will display a list of Bluetooth enabled printers you can connect to.
- Paper Size – the default paper size will be 62mmX100mm. We recommend labels of this size. However, if you use a continuous label roll you may need to change the default paper size.
- Print Test – sends a test badge print job to the printer, this is perfect for testing/troubleshooting.
- Reachability Test – reachability test makes sure there is a connection between the terminal and the printer and will confirm this by showing a message on your iPad screen. This is also perfect for testing and troubleshooting.
My Brother QL-820NWB Bluetooth Printer cannot print
If your Bluetooth printer stops working or loses connectivity you may need to reconnect the printer to your iPad. But first, you will need to un-pair it from the Teamgo App and the iPad itself.
- Check to ensure the Bluetooth printer is not paired with the Teamgo app. Login to your Teamgo application and view PRINTER SETTINGS.
- Check your iPad’s settings app. If the Bluetooth printer is still showing as connected, select it and tap the INFORMATION (i) icon.
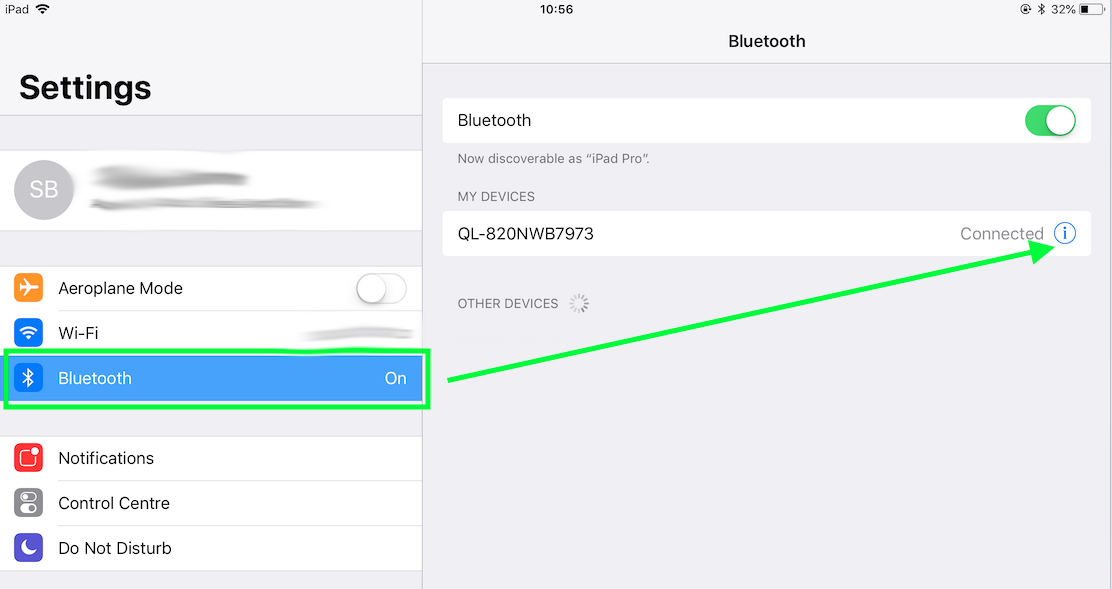
- Tap FORGET THIS DEVICE.
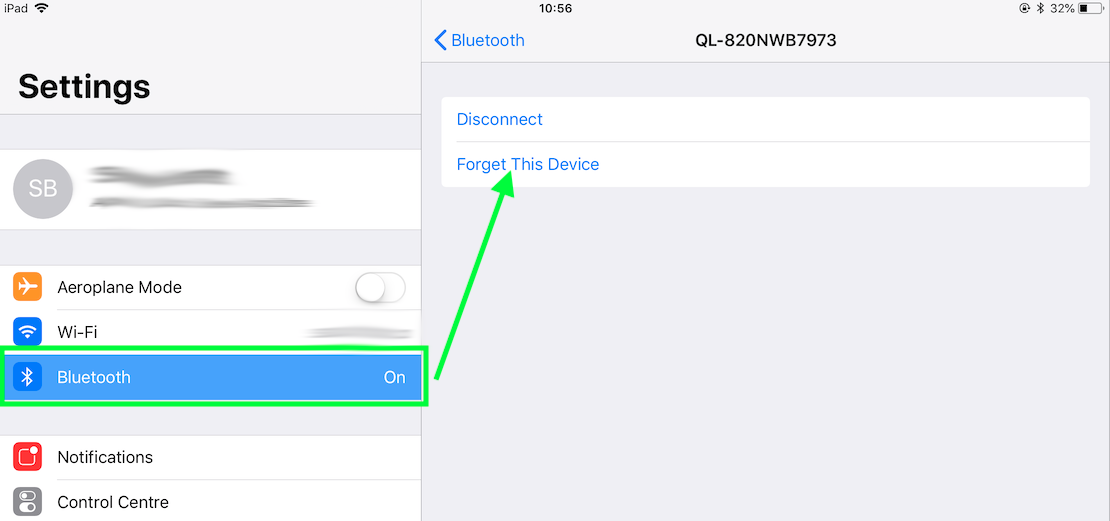
- Now reconnect your Bluetooth printer to the iPad.
Printer Stops Working
There are a few options to try if your printer displays an error message on the iPad, won’t print, or if simply nothing happens.
- Logout of the iPad app by tapping the bottom right corner of your iPad terminal until you see a settings icon appear. Tap the settings icon and then enter your iPad terminal password (that is, your iCloud account information).
- You can log out of the app by closing the application and clearing it from the iPad memory (double tap home button on the iPad and swipe up on the app window).
- Login to the iPad app again and navigate to the Printer settings (as pictured above).
It’s likely none of your settings has changed at this point. If the Printer is not shown on the settings page try reconnecting it. If the printer does show, try these options:
- Use the Print Test function. If that is successful, your printer should be ready for use.
- Use the reachability test. If a connection is encountered, try running a print test.
- This same process applies to both WiFi and BlueTooth connected printers.
- Ensure you are running the latest version of Teamgo (the App Store will always have the latest version available). If not, download a new version.
- Ensure your iPad is a supported model and is updated to the latest version of iOS.
Please note
- It’s highly unlikely you will ever need to delete the Teamgo app and reinstall to get you printer to work. Please, refrain from doing that unless our support team instructs you to do so.
- If you turn off your printer or experience a power failure, you might need to connect it to the iPad again. Printers are assigned a unique IP address on the WiFi network. If they are turned off, the IP address could be reset and therefore you will need to reconnect it.
- Sometimes, IT Admins set a fixed (static) IP to a printer so the IP never changes, not even when the printer is turned off. If you have a fixed IP number, make sure it matches the number displayed on the printer setting of your iPad terminal.
- If you cannot see your Printer on the network, ask your IT Admin for assistance.